Showing posts with label makeup review. Show all posts

Friday, July 27, 2012

How to Apply Eyeliner


Recently I have been experimenting with a couple of different brands and types of eyeliners to see which ones I like best. Because it's so hard to choose whether pencil, liquid or even gel are the best ones for you! I mean, seriously all three seem like pretty good choices... but each has their goods and bads and occasions which they best suit. Also, it's hard to decide whether to use an expensive liner or a cheap drugstore one!

choices. choices. choices.

What is the right choice? The answer is simple, it depends who you are, what you like, how much money your willing to spend and where you're planning to wear your eyeliner.

Pencil Eyeliner

There are over 9000 different types of pencil eyeliners out there! Like wooww!!
But my favourite would have to be Rimmel London's Soft Kohl Kajal Eye Liner Pencil

Photo credit: beautylish.com
 This pencil liner is Amazing! It is so soft, smudgeable and practically lasts all day! It also comes in 9 different shades! The only disadvantage is that you have to sharpen pencil eye liners... but other than that, this eyeliner is perfect for the waterline and even your upper eyelash line; however, I prefer to use liquid or gel liners for that.

So how do you apply pencil eyeliner?

Simple, you prime your eyes, and draw very carefully along your waterline or upper eyelash line. Make sure you're very careful and go slowly if it's your first time. But remember, practice makes perfect and you can always erase it with a makeup wipe!! I use pencil liners if I want a subtle look for everyday definition.

Liquid Eyeliner

If you love a smooth, line which is very easy to apply, then go for the liquid eyeliners! There is a huge, huge range to choose from, and some are so cheap! My favourite, surprisingly is Revlon Colorstay Liquid Eye Pen

Revlon ColorStay™ Liquid Eye Pen
Photo Credit: revlon.com.au
Liquid eyeliners are probably the easiest to apply, and this eyeliner makes it even easier! One quick swipe of the pencil and voila, it's done! This pencil has a felt tip for even more precision and ease. If you have a wobbly hand, then get this because it will feel just like drawing with a felt pen, not some foreign equipment! And $5?? Bargain!!

How to apply it?

You just shake, swipe and enjoy. It's that easy!

Gel Eyeliner

Gel eyeliners are just awesome! Perfect for everyday use or even parties!! My favourite would definitely have to be Maybelline Lasting Drama Gel Liner
EyeStudio_290
Photo credit: maybelline.com.au

Wow. It's all I can say about this eyeliner. So dramatic and ever lasting! Purchase it. Purchase it. Purchase it. It is my favourite eye liner I've ever used (I like it more than M.A.C!) The applicator is so easy to use and this eyeliner has lasted me so long that it's not even funny!!

On to the application...

So easy to apply, just dip the brush that it comes with in the pot, wipe it on a tissue and then apply it in a line confidently so that it is smooth! Gorgeous. Now you have your own dramatic look to show off!! For even more of a dramatic look, try the cat flick at the corners of your eyes. This opens your eyes up so much!


Best of luck applying that eyeliner,

xoxo themakeupqueen

Thursday, July 26, 2012

NARS Blush-Bronzer Duo

It's extremely hard to find the perfect blush and bronzer which exactly match your skin and gives you a radiant glow.

But not anymore.

NARS Blush- Bronzer Duo is a blush and bronzer all in one product!
Blush - Bronzer Duo
NARS Blush-Bronzer Duo


This Blush-Bronzer Duo is $41 from the NARS makeup website online. BARGAIN! A blush and bronzer for $41 altogether!

It is available in two shades: Orgasm/Laguna and Skin/Casino:
  • Orgasm/laguna has a pinky blush with a lightish tan coloured bronzer.
  • Skin/Casino is a little more bold with a purpley blush and a darkish tan coloured bronzer.
Each shade is perfect for every one's skin type, as all you have to do to find the perfect shade is mix the blush and bronzer together! Maybe you'd like a pinkish blush one day, and the following day a more sutle brownish blush... Well its now all possible with this one NARS Blush-Bronzer Duo.

I have this Blush-Bronzer Duo in Orgasm/Laguna and it is amazing! It is by far my favourite blush and bronzer and it is so easy to apply! Definitely purchase this one, it is a makeup essential!

For even more of a flawless look, I use the Sigma F40 large contour brush and slightly brush the product along my cheeks and then blend it out. Perfect. A healthy glow to my cheeks and a new shade everyday!

That's all for my review on NARS Blush-Bronzer Duo. Check back later for even more makeup reviews!

xoxo themakeupqueen

image from http://www.narscosmetics.com/ visit their site for more information!

Sunday, July 22, 2012

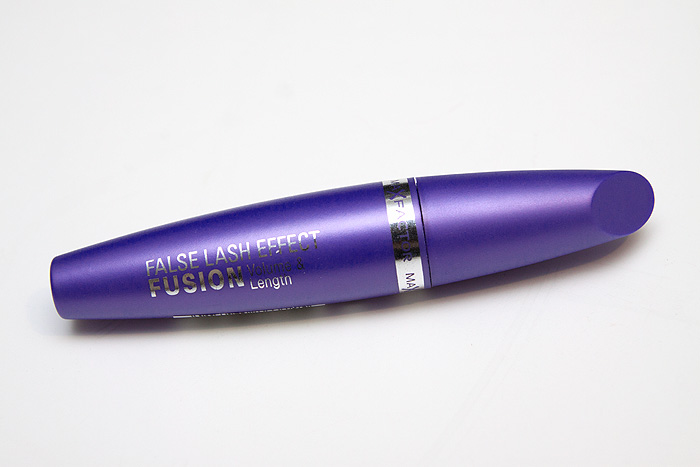
MAX Factor False Lash Effect Fushion Mascara


Photo credit: totalbeauty.com
I often don't really mind what brand Mascara I use. Because personally, I believe that they're all pretty much the same...


But.. this mascara is awesome for those girls who like that dramatic look. If your a bold type of gal, or you loves to wear false lashes, then put down those fake lashes and throw away the glue. MAX Factor has found you something even better.. a mascara which makes your lashes fuller, darker and pretty much look like they're false!


And this mascara is so versatile as well, one coat, two coats, three coats, twenty coats... you name it. You pick whether you'd like subtle mascara or a really full look! The brush is also really great because it doesn't make my eyelashes clump (eww I hate clumpy eyelashes)!


So if you're looking for a new mascara, or just feel like changing it up and giving a dramatic look a go, then MAX Factor False Lash Effect Fushion Mascara is the one for you!


xoxo themakeupqueen


Thursday, July 19, 2012

Napoleon Blush Patrol

Blush PatrolI love Napoleon's Blush Patrol because it has an amazing swirled design, creating a beautiful and unique blend of blush colour each time I apply it! If I want a darker blush, I rub my brush into the darker colour more. And if I want a subtle blush, I rub my brush into the lighter colour more! Every combination is different, which is what makes this product so unique!

Napoleon Blush Patrol has lasted me 2 years now and it barely looks like I even used any!! I only need to use a tiny amount on my blush because it's so pigmented!


As for the price...$60? WELL WORTH THE PRICE!! If you think about how long it will take to use the whole pan, you will realise just how much a bargain this product is!

But be warned to use it with a good quality blush brush and to not use too much because then it will look cakey! (Let's face it, NO ONE wants cakey makeup!) I use a Nude by Nature or Sigma Kabuki brush, depending on which ones are in cleaning. Angled brushes also work perfectly for blush as well!

xoxo themakeupqueen

Revlon Colorburst Lip Butters

Photo credit: body-soulbeauty.com
My absolute favourite Revlon product is the Revlon colorburst lip butters! There are a whopping 20 shades available! These lip butters also hydrate your lips and give them a baby soft feel! Now you don't have to worry about your lips drying out from using other brands of lip products which dehydrate your lips!


I love every single shade of these lip butters. Some are more pigmented then others and some are more shiny than others. But overall, each shade has a unique quality and occasion which it would be perfect for!

My favourite of all the shades is Sugar Frosting

Photo credit: shopworldph.com
I love to use this lip butter every day because it gives my lipes a subtle shine and glow! It is perfect for school or work, if you want a 'naked' look!
Photo credit: shopworldph.com
I also love Candy Apple

This shade works amazingly for a dramatic, glossy, red lip and I recommend it if you're a red lip kind of gal.


Revlon Colorburst Lip Butters are amazing and I recommend them to everyone no matter what age you are, as there is such a diverse range!

xoxo themakeupqueen

M.A.C Fluidline


 Fluidline
Photo credit: maccosmetics.com.au
I LOVE M.A.C fluidline! I use it when I want a well defined eye. It is ultra smooth and I can easily apply it with one stroke of my brush. Smudge proof. Lasts forever. 6 Shades. What more could you ask for?

M.A.C fluidline is only $32! I know, pretty pricey for an eyeliner... But M.A.C fluidline isn't just any eyeliner ladies, it is one of a kind and lasts so long! Definitely worth its price in my eyes.


The six shades are:

1. Rich Ground-Reddened Coco with frost


Photo credit: maccosmetics.com.au
2. Dip Down-Deep dark flat brown

Photo credit: maccosmetics.com.au

3. Blitz and Glitz-Intense black flashed with gold pearl

Photo credit: maccosmetics.com.au

4. Black Track-Solid flat black

Photo credit: maccosmetics.com.au

5. Wave Line-Navy Blue with low level gold pearl

Photo credit: maccosmetics.com.au

6. Macroviolet-Deep smoked violet with red pearl

Photo credit: maccosmetics.com.au

To apply the M.A.C fluidline, I use my M.A.C 211 Pointed Liner Brush which was $37. I love the shade Blitz and Glitz because it has a pearly tone, rather than a solid black. Definitely try these ones out!

xoxo themakeupqueen

M.A.C eyeshadow palettes

There are two different types of eye shadow x4 palettes available from M.A.C, which are just gorgeous! Each palette comes with four versatile colours, perfect for that dynamic smokey eye look. And for $75, these palettes are reasonably priced, considering the high pigmentation of the shades, making them last longer!

SHOP AND DROP: EYESHADOW x4
Photo credit: polyvore.com
This violet inspired palette is perfect for brown eyes, as violet compliments the gold and just you know, makes your eyes 'pop'! I have brown eyes and I personally use purple tinted eye shadows as a base colour and then add a neutral colour over the top. But I'm not such a 'bold' gal, so if you are, GO ALL OUT and use the really bold colours!! It's all about experimenting.

This palette comes in 4 contrasting shades of violet: Sugar Stack, Hypnotizing, Power Boosted and Shop and Drop

Photo credit: maccosmetics.com.au

My favourite shade to use is Hypnotising because it works so well for an eye shadow base and it is only a subtle shade of violet-grey! If I'm doing a smokey eye look just with this palette, I use Hypnotizing as a base, Power Boosted in the crease and Shop and Drop along the lash line. I only use the slightest amount of Hypnotizing and Power Boosted because they're so pigmented! I then use Sugar Stack to highlight the inner corners of my eyes slightly, or even on my brow bone to give definition!

COLOUR ADDED: EYESHADOW x4
Photo credit: polyvore.com
This palette is for those who are lovers of yellows, blues or purples! You can even mix the shades together to create a perfect combination! I love this palette because it's just so versatile because I can create so many different shades of browns, blues, teals, violets, you name it! And the cream shade works perfectly as a highlighter!!

The shades in this palette are completely different from each other: Laudry Daze, Colour Added, Pre-Packaged and Self-Serve.

Photo credit: maccosmetics.com.au
My favourite shade in this eyeshadow palette is Laudry Daze because it is a perfect highlighting colour, even though it is pretty bright! I just use a touch of it in the corners of my eyes and it brightens my whole eyes up! Try it, it works beautifully! If I want a base colour from this palette, I mix a tiny bit of Self-Serve to the Colour Added to create a lovely golden brown. If your a teal sorta gal, then mix the yellow with the blue to create your perfect shade!


I love these eyeshadow x4 palettes and recommend that if you have a little extra cash, BUY THEM!

xoxo themakeupqueen

Wednesday, July 18, 2012

M.A.C Makeup Brushes

photo credit: maccosmetics.com.au


M.A.C Makeup Brushes: probably the most well used brand of makeup brushes, but is it the best?

Well, yes and no. I mean, I love M.A.C and have quite a few of their brushes, but I also love other brands which are cheaper and similar quality, such as Sigma.


So what are the Pros and Cons of these brushes:

PROS:

There is an enormous range of brushes, and I mean enormous! You think of a brush, it will be there. This is a huge advantage on their part, as many people will buy all their brushes from M.A.C because all the brush types they want come in so many sizes and types in one shop! The brushes are extremely high quality and I recommend trying them out!

CONS:

These brushes are fairly expensive! And if your only a teenager with not much money, because you either don't have a job or have a low paying part time job, the idea of buying one foundation brush for $88 can seem quite overwhelming! So, I recommend maybe trying out the cheaper M.A.C brushes or using cheaper brands such as Sigma, until you can comfortably afford to spend that well earned money on M.A.C!

xoxo themakeupqueen

Nude by Nature Brush Kit

The first makeup brushes I ever purchased: Nude by Nature!

Onto the Pros and Cons...

Get the Nude Look 8 Brush Kit

Phot credit:nudebynature.com.au

PROS:
8 brushes for $30, BARGIN! These were the first brushes I ever used and I must say, they were perfect for me when I was only a beginner! The whole kit comes with a Kabuki Base Brush, Blush Brush, Eye Shadow Brush, Domed Eye Blending Brush, Ultimate Cover Concealer Brush, Dual Headed Precision Eye Definer and Lip Brush and a Pencil Sharpener. The brushes are great quality for the price paid for them and they never loose hairs! So easy to clean as well! Definitely a purchase for beginners or even the makeup obsessed, like me!

CONS:
This is probably Nude by Nature's only product which I absolutely can't find any thing wrong with. Good on ya Nude!! Maybe the only thing is that their isn't really quite a massive range, as in Sigma or M.A.C. But that can be improved!

xoxo themakeupqueen

Nude by Nature Virgin Blush


Now, I 'm sure you all want to know which blush is the one for you. Be it pinky, earthy or even a classic 'tan' glow on your cheeks.

Nude by Nature have a blush which they call the Virgin Blush.

Phot credit:nudebynature.com.au


PROS:
This blush lasts a very long time and is a natural pinky colour. It is a pigmented powder which can easily be applied with a range of brushes from Nude by Nature's line (personally I use the Kabuki brush just to give a slight rosey look on my cheeks) or any other makeup brushes which you love. Angled brushes work perfectly for applying powdered blush!

CONS:
Because the Nude by Nature foundation is such light coverage, I don't feel the need to apply this blush because the redness from my cheeks is already shinning through the foundation! Possibly, it can add an extra glow to my cheeks, if I'm going for a little more 'rosey' look. But, this blush really isn't my favourite and I probably won't buy it again. The packaging is also a little messy because it spills everywhere (and I mean everywhere!) You can give it a try, as it's only around $17!

xoxo themakeupqueen

Nude by Nature Liquid Foundation and Finishing Veil

I love liquid foundation, and Nude by Nature's liquid mineral is my go to if I want a light foundation!

Flawless Liquid Velvet, Liquid Mineral Foundation

Photo credit:nudebynature.com.au
PROS:
We all know that after primer comes foundation! No one wants a caky foundation, which is why I'm sure many of you prefer using a liquid one. Nude by Nature's liquid mineral foundation is a pretty good light foundation, if you want that sort of thing. It would be great for everyday use and is very easy to apply with fingers, sponge or even a makeup brush. The foundation also lasts a long time!

CONS:
With every foundation comes cons! I haven't yet found a perfect foundation! This Liquid Mineral Foundation is a whopping $40! For a light foundation that is almost a tinted moisturiser, this can seem very expensive! This foundation also only comes in five shades, which is very limited! Nude by Nature would be wise in creating a wider range of shades so that more customers are catered for. This liquid foundation doesn't cover up much on my face and sometimes looks caky without the finishing veil!

I always finish my foundation off with a finishing veil! Here's what I think of Nude by Nature's Mineral Finishing Veil:

Photo credit:nudebynature.com.au


PROS:
This finishing veil evens out the liquid mineral foundation. It lasts a very long time and is transparent so one product fits all! This is probably my favourite product out of their range because it makes my foundation not look caky and gives me an ulluminating glow. I use the kabuki brush which comes in their brush range to give an even more flawless look!

CONS:
What can I say that is not so good about this product? Well not much, apart from the fact that it is very messy to open the container it comes in!

Tell me what you think!

xoxo themakeupqueen

Nude by Nature Undercover Airbrush Primer

Hey guys, this is my review on Nude by Nature's primer!


Photo credit: www.nudebynature.com.au

PROS:
Primer is the first thing that starts off your makeup routine. So why settle for something that isn't top notch? Nude by Nature offers a primer which smooths out the skin and lasts a very long time because you only need a small amount.

CONS:
I don't really think this product is worth the $30 that it sells for. It has an unusual smell and I've heard that it causes some people's faces to go red immediately after applying; however the redness does settle down. This could have just been one person's allergy to something in the product though. I recommend trying this product out before purchasing and if you can get pass the smell, then by all means give it a try! I personally could take it or leave it.

xoxo themakeupqueen

Tuesday, July 17, 2012

Hiding under eye circles with concealer!

Dark circles. Our worst enemy. A massive bring down to a girl's appearance.

But there is another ending to the tragic story of everlasting dark circles:

Concealer.

This is when the complications come in... What brand do I buy? How much coverage do I need? Do I need to use a corrector beforehand? Are the cheep drugstore brands ok, or do I need to purchase a more expensive one?

And the list goes on...

But before I get into the best brands to use, I'd like to address the application! No matter what brand you use: cheep, expensive or in between, the brand won't help you anyhow if the application isn't correct.

So what's the best way to apply concealer?

This really depends on what concealer you're using, you see. Because if you're using a powdered concealer, definitely go for the brush to apply it. However, the creme concealers can be a little more hard to decide what to apply them with. I suggest trying out all the different ways to decide what best suites you. Be it using your fingers, a concealer brush or even a sponge.

Personally, I think that a sponge is the best option, for me at least. This is because it deposits the makeup evenly and seamlessly, and that's the main aim for makeup isn't it? A natural look.

So how do I apply it?

Before I even start with the concealer, I moisturise and prime my whole eye area. This gives a perfect, smooth base for the concealer to blend and soak in. Now onto the application... first, I start by slightly wetting the sponge, but I squeeze as much water as I can out of it. I then softly 'dot' it onto my skin. DON'T USE TOO MUCH, as it will make your skin look cakey, regardless of the brand! I use slight circular motions to blend the concealer in. Once this is all done and looking great, I set it with a translucent powder to keep it in place! And just to brighten up my eyes even more, I use a slight dust of subtle highlighting powder over my darkest places to reflect the light and improve my whole appearance.

My favourite concealer ever! ...

Bobbi Brown's Concealer Kit.

Bobbi Brown Concealer Kit

Now Bobbi Brown concealer is simply amazing! The Concealer Kit comes with a concealer and setting powder in one! For $60 this concealer kit is well worth the price! I am dying to buy this product, but haven't yet had the chance! I also would love to purchase the corrector as well!

This concealer comes in 13 shades! Woaah what a wide range for concealer!! If you have dark circles, or just want to brighten up your eyes. This is your Go To product, seriously. It is the best on the market, in my opinion and you won't be disappointed with it!

I hope my tips help you with your concealer application from now on!

xoxo themakeupqueen