Showing posts with label makeup tip. Show all posts

Sunday, September 30, 2012

Snog? Marry? Avoid? ...

It has come to my attention, after watching an English show Snog? Marry? Avoid?, that the way you apply your makeup can alter your chances at making friends, or even finding your true love.

For example... although those 5cm fake lashes and 2cm thick eye liner might satisfy your makeup visions, it repels people because I'm sorry to say, but it may look a bit 'crazy'!

I'm sure most of you have seen the Hunger Games, and are aware of the strange looks that the people from the Capital decide to wear. From yellow eye lashes to purple skin, these embellishments are considered 'normal' and almost 'required' in the Capital.

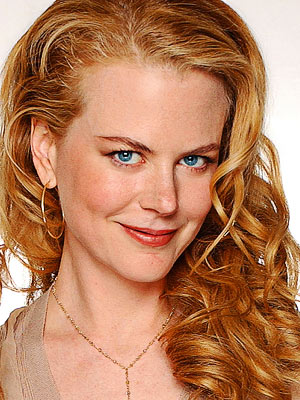
But in our modern world, such looks may only be acceptable in night clubs because quite frankly, the 'natural' makeup look is so much more appealing!

Yes, it is OK to splurge on your mascara and eye liner once in a while, or even wear falsies. But you need to consider whether your makeup look is acceptable for the venue you are attending.

For example, if you are still a school student, wearing falsies to school would definitely be a no. no. However, at a night club would be the perfect place.

So the message today, is to try to wear makeup as natural as possible and only go all out if you consider it completely necessary. Because remember, makeup isn't about covering up your face... it's about show-casing that beautiful and unique face that you were born with.

xoxo themakeupqueen

Tuesday, August 14, 2012

Choosing Your Makeup Look

Everyone aims for that one signature look. A look that defines them. A look that expresses their whole personality. A look which is unique.

But picking that 'look' can be an extremely difficult task!!

Bold red lippie?? Dark eyeliner?? Bright eye shadows?? Or just a simple natural look???

All these fantastic looks suit so many different girls! But which one suits you??

I can't answer the question for you, but go for whatever you're comfortable with. Whether its BOLD or just simple.

Or you could try new looks each day and decide which ones you like best!!

Good luck,

Xoxo themakeupqueen

Thursday, August 9, 2012

Natio Young Collection Review

Hi to all my makeup fans!!

I am so sorry that I haven't posted in ages!! My computer crashed... but I'm back and ready to get back into this!!

Ok, so recently I purchased the Natio Young Pore Unclogging Facial Wash. I'd been wanting to try it for ages, but I never got around to it. It wasn't until it was suggested to me by the girl from Revlon that I realised how dry my skin had gotten!! Seriously, if your skin is dry, it just ruins your foundation... so I rushed over to Natio and purchased this bargain for a mere $10!

photo credt: cosmeticbarn.com.au
I've had this product for around a week now and I am just loving it! It is so amazing. As soon as I used it, my face felt smooth and my foundation was noticeably more flawless. I can't even express my satisfaction in words, you'll have to try it yourself to see what I mean.

Anyway, this product is from the Natio Young range which is just awesome for gals who are in their teen puberty period. We all know that our skin can get oily, dry, breakout, etc. etc. It all just happens at this age. BUT!! Natio have a solution... so try it out!

Natio also have a pack that is available for $20. Included is the facial wash, toner and moisturiser. You save $10 by purchasing the products in the package!! I didn't end up purchasing this package, but I will definitely be back this weekend to purchases it :)

xoxo themakeupqueen

Friday, July 27, 2012

How to Apply Eyeliner


Recently I have been experimenting with a couple of different brands and types of eyeliners to see which ones I like best. Because it's so hard to choose whether pencil, liquid or even gel are the best ones for you! I mean, seriously all three seem like pretty good choices... but each has their goods and bads and occasions which they best suit. Also, it's hard to decide whether to use an expensive liner or a cheap drugstore one!

choices. choices. choices.

What is the right choice? The answer is simple, it depends who you are, what you like, how much money your willing to spend and where you're planning to wear your eyeliner.

Pencil Eyeliner

There are over 9000 different types of pencil eyeliners out there! Like wooww!!
But my favourite would have to be Rimmel London's Soft Kohl Kajal Eye Liner Pencil

Photo credit: beautylish.com
 This pencil liner is Amazing! It is so soft, smudgeable and practically lasts all day! It also comes in 9 different shades! The only disadvantage is that you have to sharpen pencil eye liners... but other than that, this eyeliner is perfect for the waterline and even your upper eyelash line; however, I prefer to use liquid or gel liners for that.

So how do you apply pencil eyeliner?

Simple, you prime your eyes, and draw very carefully along your waterline or upper eyelash line. Make sure you're very careful and go slowly if it's your first time. But remember, practice makes perfect and you can always erase it with a makeup wipe!! I use pencil liners if I want a subtle look for everyday definition.

Liquid Eyeliner

If you love a smooth, line which is very easy to apply, then go for the liquid eyeliners! There is a huge, huge range to choose from, and some are so cheap! My favourite, surprisingly is Revlon Colorstay Liquid Eye Pen

Revlon ColorStay™ Liquid Eye Pen
Photo Credit: revlon.com.au
Liquid eyeliners are probably the easiest to apply, and this eyeliner makes it even easier! One quick swipe of the pencil and voila, it's done! This pencil has a felt tip for even more precision and ease. If you have a wobbly hand, then get this because it will feel just like drawing with a felt pen, not some foreign equipment! And $5?? Bargain!!

How to apply it?

You just shake, swipe and enjoy. It's that easy!

Gel Eyeliner

Gel eyeliners are just awesome! Perfect for everyday use or even parties!! My favourite would definitely have to be Maybelline Lasting Drama Gel Liner
EyeStudio_290
Photo credit: maybelline.com.au

Wow. It's all I can say about this eyeliner. So dramatic and ever lasting! Purchase it. Purchase it. Purchase it. It is my favourite eye liner I've ever used (I like it more than M.A.C!) The applicator is so easy to use and this eyeliner has lasted me so long that it's not even funny!!

On to the application...

So easy to apply, just dip the brush that it comes with in the pot, wipe it on a tissue and then apply it in a line confidently so that it is smooth! Gorgeous. Now you have your own dramatic look to show off!! For even more of a dramatic look, try the cat flick at the corners of your eyes. This opens your eyes up so much!


Best of luck applying that eyeliner,

xoxo themakeupqueen

Tuesday, July 24, 2012

How to Apply Mascara

Maybelline Define-A-Lash Volume Waterproof Mascara
Photo credit: beautyfreaknful.blogspot.com
I love wearing Mascara because it just opens up my eyes, and makes them appear so much more defined. But I absolutely hate clumpy mascara. I hate it. It looks so unnatural. So, I've developed my own method of making sure I never have to deal with clumpy eyelashes again...


Step 1

Wiggle the wand left to right at the base of your lashes. This makes your eyelashes look so much more thicker and gives the illusion of length!


Step 2

Pull the mascara up and through the lashes, but make sure you wiggle as you go because this separates the lashes!

Step 3

Close one eye and place the mascara wand on top of your lashes at the base and then pull it through to the tips. This ensures that no clumps are left and leaves your eyelashes looking awesome!!


So that's how you apply the mascara, but what about finding the right mascara that works best for you and the purposes that you are going to use it for... There are so many on the market, from lengthening to thickening, long lasting to waterproof. There are also many different brands and prices. I don't really mind which brand of mascara I use because they are all pretty much the same to me! As long as its waterproof, I'll use it!!

And I don't bother wasting all my hard earned money on the expensive mascaras if the drug store ones are just as good. Mind you, the expensive mascaras are said to last longer and not become clumpy. So if you hate clumpy mascara and have a little extra cash to spend, then by all means go for the expensive mascara! Personally, I like to spend more money on products like foundation, where the expensive brands are generally better; however, with mascaras, the cheep brands can be good as well. This is why I only sometimes buy the expensive mascaras!

Good look with applying your mascara girls,

xoxo themakeupqueen

Monday, July 23, 2012

How to Apply Primer

Primer is probably my most prized makeup possession! This is solely because it transforms my whole look, and with the right primer, your makeup can last so much longer and look so much smoother! Now I've been searching for ages for the right primer!! It's so hard to find the right one for you, because every one's different. I didn't want to go all out and buy a really expensive primer at first because what if it wasn't good?? So that's why I settled for the Revlon primer for now. It is A-mazing and you must try it because it's my favourite primer I've ever used, ever!

Revlon PhotoReady Color Correcting Primer

Photo credit: revlon.com
But onto the application....


What's the use of primer if you don't apply it correctly? You only ever need the smallest amount, and it helps if you've exfoliated and moisturised first. This gets rid of the dry skin and creates a smooth, moisturised base. The primer 'primes' your face as its name suggests. It creates a silky smooth base for your foundation and the rest of your makeup!!

It's actually really easy to apply primer with your fingers, I don't really bother using a brush because that means cleaning it... nah, I'm totally kidding, its because the primer is warmed up by your fingers as it's blended into the skin. This is the perfect way for applying it.

The areas that need the primer the most are the cheeks, chin, forehead, nose and eyes. The outer areas of your face don't really need as much primer, but it sure helps to apply it there as well. Blend from the nose outward for the best effect. And always wait for the primer to set before applying foundation!!

Hope this helps you when applying your primer!

xoxo themakeupqueen

Tuesday, July 17, 2012

Nicole Kidman Makeup Look

Nicole Kidman. Famous for her roles in so many movies. Australia. Golden Compass. Moulin Rouge. to name a few.
Photo credit:people.com

But how does she achieve such a soft, glowing look? How does she manage to look so natural, yet bold at the same time??

How? Her makeup artist Carol Shaw (founder of Lorac Cosmetics) tells us how:

Photo credit: people.com

Nicole Kidman loves a fresh modern look. Her signature look is defined smokey eyes with pinky-peach rosy cheeks and lips. Carol Shaw loves to accentuate Nicole's big blue eyes with a defined smokey look so that they really 'pop'.

How does she do it??

1. Lorac Behind the Scenes Primer ($20)

Carol starts off by using a Lorac behind the scenes primer from the lash to the brow in the eye area.


2. Lorac Close Up Eye Shadow Kit (36)

Carol highlights with the lightest shade over the whole lid, then she applys a dark crease which blends out over the lid and into the brow. She uses a liquid lustre over the top to make Nicole's makeup last longer and to give a shimmery effect.


3. Lorac Front of the Line Pro eyeliner ($23) in Black

To apply this eyeliner, Carol starts close to nose and works her way out, getting thicker as the line glides to the outer corner of the eye. She smudges it underneath the eye as well.


4. Lorac Smooth Breakthrough Performance Foundation in SMS 1 ($38)

Next, she applys the foundation, but only a little to the red areas.


5. Lorac Perfectly Lit Oil-Free Luminising Powder in Luminising ($33)

Lastly, Shaw applys the Luminising Powder on Nicole's cheeks to give them a lovely radiant glow.


6. Lora Breakthrough Performance Lipstick in Premiere ($22)

Carol completes Nicole's look with a peachy lipstick and voila, Nicole's look is complete!


And that's that.

xoxo themakeupqueen

How to apply foundation flawlessly

Foundation, the base of a girl's makeup.

This magical creation evens out your skin tone, covers your blemishes and overall improves your appearance! But without the right foundation for you, your skin can look cakey, streaky, 'too orange' or simply just 'not right'!

Finding the perfect foundation is extremely hard, and I myself haven't yet found one. But, even if you don't have a perfect foundation, you can still make it look close to perfect by the way you apply it.

Before you start!

Definitely exfoliate, moisturise and prime before you apply foundation. This is a complete must for me! Without following these simple steps, my foundation doesn't look as good! If you don't exfoliate, dry skin or dirt can get trapped in your makeup all day! GROSS! And by moisturising and priming, your giving yourself a better chance of making your foundation smoother and last longer! It also prevents dry skin from making your makeup look terrible. What I use most days...

Garnier Exfoliators and Toner
Clean and Clear moisturiser
Revlon Colour Correcting Primer
Onto the application processes...

1. Applying with your fingers

This technique can work well with light foundations or tinted moisturisers. Make sure your hands are CLEAN first! Place a dot of foundation on your nose, each cheek, three on your forehead and three on your chin. Blend in circular motions with your ring fingers from your nose out. Then blend across your forehead, along your chin and down into your neck (because no one wants a 'line')! Once this is done, check closely in the mirror that you haven't missed anywhere on your face and everything looks smooth. Almost done! I always use a translucent powder to set my makeup and give it a more flawless look!

2. Applying with a sponge

Creme or liquid foundations work well with a sponge! Make sure you wet your sponge before hand and squeeze as much water as you can out of it! Then place dots of foundation on each area of your face, as described above. Work from your nose out in circular motions to blend the foundation all over your face and down your neck. I always finish these foundations with a translucent powder as well!

Makeup sponges

3. Applying with a makeup brush

Alternatively, you can use a makeup brush to apply your foundation! The list of different brushes you can use goes on and on. Personally, I use the Sigma F80-Flat Top Kabuki because it blends out my foundation so well! Angled brushes can also work to get into the hard to reach areas! Stippling brushes are great for liquid foundations to 'stipple' the foundation lightly on. The best brushes for powder are kabuki brushes because they have so many dense fine hairs which evenly deposit the makeup around your face!Again, I always finish my foundation with a translucent finishing powder!

Sigma F80 Flat Top Kabuki Brush-http://tillyglitter.blogspot.com.au

So I hope you can now create that flawless look that you've always wanted!

xoxo themakeupqueen

Hiding under eye circles with concealer!

Dark circles. Our worst enemy. A massive bring down to a girl's appearance.

But there is another ending to the tragic story of everlasting dark circles:

Concealer.

This is when the complications come in... What brand do I buy? How much coverage do I need? Do I need to use a corrector beforehand? Are the cheep drugstore brands ok, or do I need to purchase a more expensive one?

And the list goes on...

But before I get into the best brands to use, I'd like to address the application! No matter what brand you use: cheep, expensive or in between, the brand won't help you anyhow if the application isn't correct.

So what's the best way to apply concealer?

This really depends on what concealer you're using, you see. Because if you're using a powdered concealer, definitely go for the brush to apply it. However, the creme concealers can be a little more hard to decide what to apply them with. I suggest trying out all the different ways to decide what best suites you. Be it using your fingers, a concealer brush or even a sponge.

Personally, I think that a sponge is the best option, for me at least. This is because it deposits the makeup evenly and seamlessly, and that's the main aim for makeup isn't it? A natural look.

So how do I apply it?

Before I even start with the concealer, I moisturise and prime my whole eye area. This gives a perfect, smooth base for the concealer to blend and soak in. Now onto the application... first, I start by slightly wetting the sponge, but I squeeze as much water as I can out of it. I then softly 'dot' it onto my skin. DON'T USE TOO MUCH, as it will make your skin look cakey, regardless of the brand! I use slight circular motions to blend the concealer in. Once this is all done and looking great, I set it with a translucent powder to keep it in place! And just to brighten up my eyes even more, I use a slight dust of subtle highlighting powder over my darkest places to reflect the light and improve my whole appearance.

My favourite concealer ever! ...

Bobbi Brown's Concealer Kit.

Bobbi Brown Concealer Kit

Now Bobbi Brown concealer is simply amazing! The Concealer Kit comes with a concealer and setting powder in one! For $60 this concealer kit is well worth the price! I am dying to buy this product, but haven't yet had the chance! I also would love to purchase the corrector as well!

This concealer comes in 13 shades! Woaah what a wide range for concealer!! If you have dark circles, or just want to brighten up your eyes. This is your Go To product, seriously. It is the best on the market, in my opinion and you won't be disappointed with it!

I hope my tips help you with your concealer application from now on!

xoxo themakeupqueen